IMPORTANT: BEFORE YOU BEGIN:
You will need this Microsoft Word document to carry out the exercises below.
Click the link. Download this Microsoft Word Document. Open it on your screen.
-
Go To A Table
Use the GO TO dialog box to go to your two tables in your document.
-
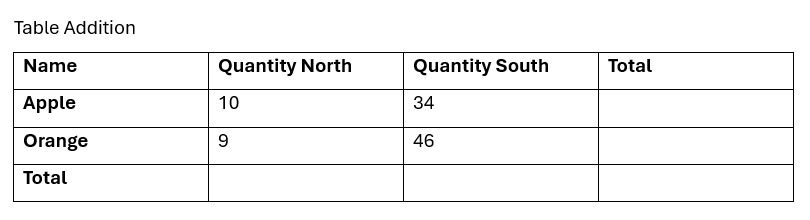
Formula in a Table: Addition
Use the GO TO dialog box to find the table named Table Addition (view image below)
Use a formula for addition to insert the answers in the TOTAL rows
for Apple, Orange, and Total. Then use a formula to find the total
for QUANTITY NORTH column and QUANTITY SOUTH column and the TOTAL column.
-
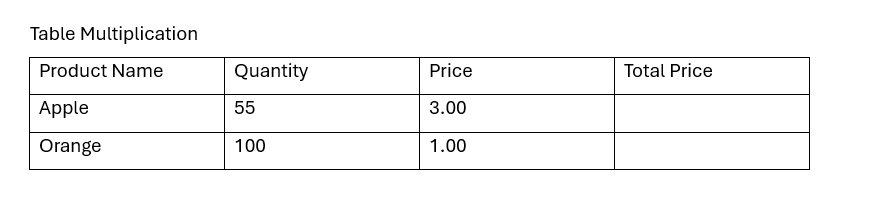
Formula in a Table: Multiplication
Use the GO TO dialog box to find the table named Table Multiplication (view image below)
Use a formula for multiplicaton to insert the answers in the TOTAL PRICE column.
-
Create Table of Contents
Create a table of contents using these phrases:
CHAPTER 1, CHAPTER 2, CHAPTER 3, up to CHAPTER 14
Insert the Table of Contents on page 2.
Put each "CHAPTER #" at the top of each page.
When finished, update your table of contents.
-
Find and Replace All The Words
Use the
FIND AND REPLACE
dialog box to find all the words CHAPTER
and replace with the word
LESSON
Then, update your table of contents to reflect the changes.
-
Cross Reference Table
Create 2 cross references.
Using the
GO TO
dialog box
Find the Table called "Table Addition"
Click one line below the table
Create a cross reference for the Table Addition
When finished:
Using the
GO TO
dialog box
Find the Table called "Table Multiplication"
Click one line below the table
Create a cross reference for the Table Multiplication
-
Line Numbers
Add continuous line numbers from the top of your document to the very bottom of your document
Remove the line numbers without using the undo
-
Left Center Right
Open a new blank Word document
Show your ruler
Set a left tab at the number 1 on your ruler
Set a center tab at the number 3 on the ruler
Setting right tab on the ruler at the number 5
And now type the word January so it's lined up with the left tab number 1 on your ruler.
Type the word February so it's lined up with the center tab at the number 3 on the ruler
Type the word March so it is aligned with the right tab at the number 5 on the ruler
Close the document without saving any changes. -
Microsoft Defaults
Question / No Hand On:
How to change the Microsoft Defaults and why is it important to do so?
-
Restrict Access
Make the document read only.
How to disable read only.
-
Quick Parts Header and Footer
Create a header that consists of the name of the city you are currently in. Align it to the left.
Add it to the Quick Parts.
Create a footer that includes the name of your favorite food. Align it to the right.
Add it to the Quick Parts.
Open up a new document Open up the header section and insert the quick part that shows the name of the city you are currently in.
Go down to the footer area and insert the quick parts that include the name of your favorite food
-
Find comments in your Word document
Use the
NAVIGATION PANE
to find the comment inserted into your document
-
Not In NoRecall.com. If they don't know, they need training.
Create a table of figures for the two tables (Table Addition and Table Multiplication).
Place the table of figures at the end of your document
-
Quick Access Toolbar
Show the quick access toolbar below the ribbon,
Add the Table of Figures icon to the quick access toolbar.
-
Create a "Legal Style"
Create a style with the following attributes
Justify,
1.5 spacing,
12 points of space after a paragraph,
indent the left side of the paragraph to the .5 on the ruler, indent the right side of the paragraph to 5.5 on the ruler,
name the style “intro paragraph” and make sure that this style is available for all new documents in the future
-
Check for issues.
Remove comments using the DOCUMENT INSPECTOR.
-
Outline Numbering.
Read all the instructions below before beginning.
Define a new list style using the following instructions Name it the following Mynumberingstyle
I. The first level with be capitalized Roman Numerals with a period
A) The second level will be capitalized A, B, C, with a closed parenthesis
a. The third level will be small abc with a period.
Save this numbering style so it is available in this document and all Word documents in the future.
Once you are finished, open a new document, do you see the numbering style you just created?